How to Read Crochet Charts and Symbols: A Beginner’s Guide


If you’re a beginning stitcher, opening a crochet kit for the first time can feel… dramatic. There are skeins of yarn, a hook that looks suspiciously like a tiny question mark, and a pattern with a science-fiction alphabet of symbols. Relax. This guide breaks down the weird symbols, common abbreviations, and simple tracking tricks so you can confidently follow any crochet kit pattern — whether you’re making an animal, a fruit, a penguin, or a tiny potted plant.
Why charts matter (and why you should try them)
A good crochet kit often includes both written steps and a chart. Charts are visual: they compress a lot of info into a small space and — once you get them — let you scan a pattern at a glance. For compact projects like fruits or coasters, charts are faster to read than long paragraphs. For amigurumi animals or penguin pals, charts make symmetry and shaping obvious. Don’t worry if the first few look cryptic; they start to behave like a map after a project or two.
Crochet chart basics: common abbreviations & symbols
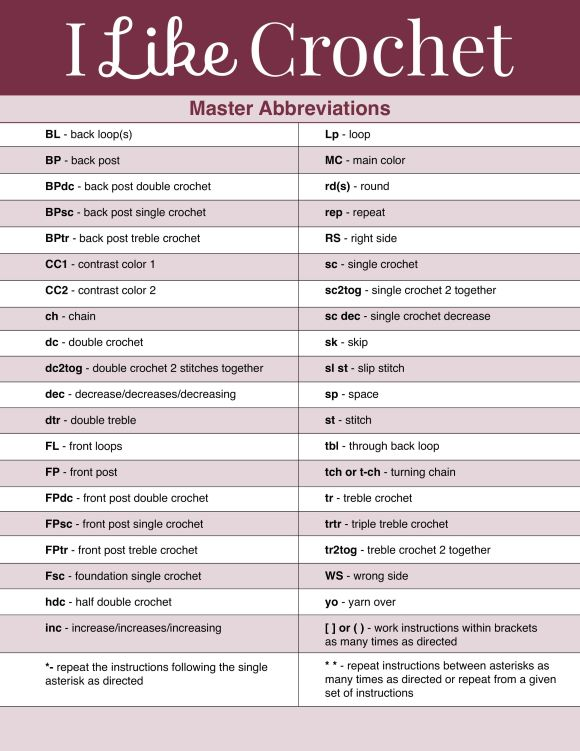
Common stitch abbreviations
- sc — single crochet (short, dense stitch)
- dc — double crochet (taller stitch)
- hdc — half double crochet (in between)
- ch — chain (foundation)
- inc — increase (add stitch)
- dec — decrease (remove stitch)
- sl st — slip stitch (joins, edges)
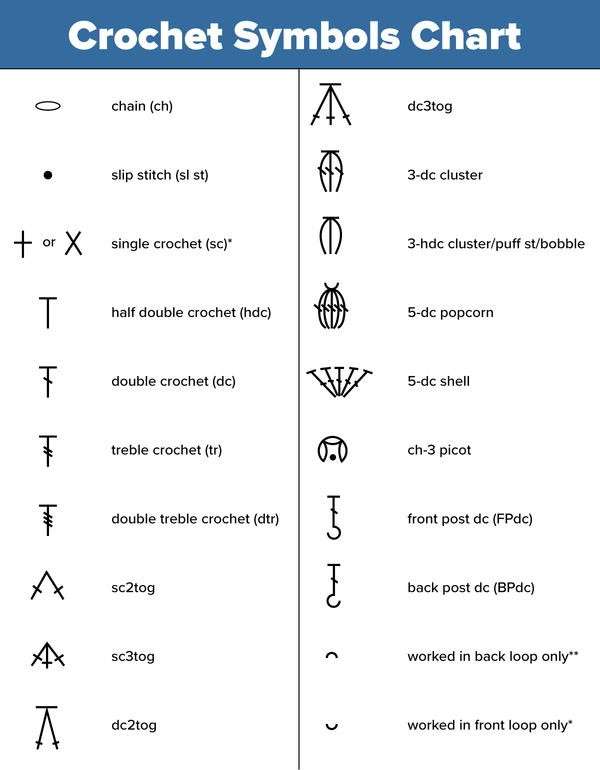
Typical chart symbols
Dots often indicate single crochets; an “X” or filled square can mark a standard stitch; open ovals usually mean chain spaces. Designers sometimes add color blocks to show where to change yarn — useful for fruits or striped animals. The exact glyphs differ a little across patterns, but the ideas repeat.
How to read the layout: rounds vs. rows
Most amigurumi-style projects in a crochet kit (heads, bodies, small toys) are worked in rounds: start at the center and spiral outward. Flat projects, like coasters or some fruit pieces, are worked in rows: start at one edge and go back and forth. Before you begin, check whether the chart is numbered for rounds or rows and where it wants you to start — that’s half the confusion solved.
Follow-along tricks that save hours
Break the pattern into bites
Don’t try to read the whole chart at once. Focus on the current round or row. Read the symbols for that line, then do the line. Repeat.
Mark as you go
Use stitch markers to mark the start of a round. Keep a scrap of paper or a notecard and jot down the stitch count for each round — it’s a tiny progress log that prevents “oh no where am I?” moments.
Count often
Charts will usually list the stitch total for a round. Count to confirm. If the number is off, unpick the last round and fix it — faster than trying to patch a mistake later.
Color changes & yarn joins
If your crochet kit calls for color blocks,such as strawberries, bananas, potted plants, the chart will show where to switch. A neat trick: finish the last yarn-over of the old color and complete the stitch with the new color — it creates cleaner joins and fewer visible tails to weave in. Small projects mean small ends to hide, which is a quiet win for beginners.
Quick practice project: start with a tiny animal or fruit
Pick a small item from your crochet kit — a tiny animal head or a strawberry — and follow its chart slowly. Start with the head: work rounds, mark your start, and count stitches often. For fruits, practice the color change and shaping; for animals, practice increases and decreases so features look symmetrical. These compact projects build confidence fast. Pick up a beginner-friendly crochet kit now!
Materials checklist: what to look for in a kit
Not all crochet kits are created equal. Some focus on plush amigurumi animals and penguin pals; others center on fruits or vegetable themes, and a few offer mini ecosystems — think potted plant kits with yarn succulents. Check whether the crochet kit includes stuffing, safety eyes (important if children will play with the toy), extra hooks, or a printed chart. Those extras save time and frustration. I once opened a kit that had only half the yarn I expected — lesson learned: now I double-check the contents before starting.
My little tips

- Your tension is yours. If stitches look too tight or too loose, try a different hook size.
- Patterns expect you to re-read lines. That’s normal. Don’t race.
- Use a highlighter on printed charts, or take a photo and digitally mark completed rows.
- If you’re an adult learning with a child, give them quick fruits and you take a potted plant — then swap. It’s fun, it’s messy, and you both learn.
When charts still feel hard: mix chart + written steps
If a chart scares you, follow the written instructions in your crochet kit first. Once the stitches form, glance back at the chart. That back-and-forth is an excellent learning loop and helps you internalize both formats.
Conclusion: charts become second nature
Reading crochet charts takes practice, but after a few small projects they stop looking like alien diagrams and start feeling like roadmaps. Begin with a compact, beginner-friendly crochet kit and choose small wins: an animal amigurumi, a simple fruit, or a potted plant coaster. Those quick successes teach you symbols, shaping, and color changes — and before long you’ll be scanning charts like a pro.
Ready to get started? Grab an Animal Crochet Kit, Fruits Crochet Kit, Penguin Crochet Kit, or Potted Plant Crochet Kit and follow a chart today — your hands will remember before your head does. Start your creative crochet journey now!